How do you cool a blazing-hot processor crammed inside a laptop thinner than a textbook? How do you move heat away from a densely packed server blade without bulky fans? These are the thermal nightmares engineers face every day. As electronics get smaller, faster, and hotter, traditional cooling methods often fall short. Enter the heat pipe: an elegant, deceptively simple device that acts like a thermal “superconductor,” moving heat with astonishing efficiency using nothing but the laws of physics. It’s the silent hero enabling much of the high-performance technology we rely on.
A heat pipe is a passive, two-phase heat transfer device with extremely high effective thermal conductivity. It uses an internal wick structure and a working fluid to rapidly transfer heat from a hot source (evaporator) to a cooler area (condenser) with minimal temperature drop, acting like a thermal superconductor. It requires no external power to operate.
But harnessing the power of heat pipes isn’t always straightforward. Choosing the right wick, fluid, and diameter, understanding their limitations, and integrating them correctly into your design are critical for success. This guide goes beyond a simple definition. We will explore the fascinating physics behind heat pipes, break down the different types and their performance characteristics, provide a comprehensive guide to critical design and integration challenges, and show you how to leverage this remarkable technology for your most demanding thermal management applications. Let’s unlock the secrets of two-phase cooling.
How Do Heat Pipes Work? The Magic of Two-Phase Heat Transfer

A heat pipe works by continuously moving heat through a passive, two-phase cycle. Heat at the evaporator turns a working fluid into vapor. This vapor rapidly travels to the condenser, where it cools and condenses back into a liquid. A wick structure then passively pulls this liquid back to the evaporator via capillary action, allowing the cycle to repeat indefinitely without any moving parts.
The Core Components: Container, Wick, and Working Fluid
Despite its magical performance, a heat pipe is made of just three simple components, sealed together in a vacuum:
- The Container (Envelope): This is the outer shell, typically a copper tube in electronics cooling. Its job is to seal the system, provide structural integrity, and offer a path for heat to enter and exit.
- The Wick Structure: This is the “engine” of the heat pipe. It is a porous structure lining the inside of the container, made from materials like sintered powder metal, fine wire mesh, or small grooves. Its crucial role is to act like a sponge, passively pulling the liquid back to the heat source using capillary action.
- The Working Fluid: This is the heat transfer medium, which exists in a delicate liquid-vapor balance inside the vacuum. For electronics, the most common fluid is deionized water due to its high latent heat of vaporization (the energy it can store when turning to steam).
The Physics Explained: Evaporation, Vapor Transport, Condensation, and Liquid Return
The continuous operation of a heat pipe is a four-step, closed-loop cycle that repeats itself constantly and rapidly:
- 1. Evaporation: Heat from your processor or component (the heat source) is conducted into the evaporator section of the heat pipe. This thermal energy causes the working fluid held in the wick to boil and turn into a high-pressure vapor (steam).
- 2. Vapor Transport: This high-pressure vapor instantly seeks the path of least resistance, which is the hollow, low-pressure center of the tube. It flows at very high speed (sometimes near the speed of sound) toward the cooler end of the pipe.
- 3. Condensation: The “cool” end of the pipe, known as the condenser, is attached to a heat sink or cooling fins. Here, the vapor cools, condenses back into a liquid, and releases a massive amount of stored energy (its latent heat). This is how the heat is efficiently transferred to the heat sink fins.
- 4. Liquid Return (Capillary Action): Now a liquid, the working fluid is “sucked” back to the evaporator by the wick structure. The wick’s porous nature creates a capillary action (the same force that pulls water up a paper towel), which passively pumps the liquid back to the heat source, ready to begin the cycle all over again.
This entire process is passive, continuous, and requires no external energy, making it an incredibly elegant and reliable thermal solution.
What Makes Them “Thermal Superconductors”?
A heat pipe isn’t *actually* a superconductor, but it’s the best analogy for its performance. Its power comes from moving heat not through simple conduction, but through mass transfer.
Instead of just vibrating atoms (like in a solid copper bar), the heat pipe physically moves a substance (the vapor) that is carrying a huge amount of thermal energy. The energy required to turn a tiny amount of liquid water into steam is massive (this is its latent heat of vaporization). When that steam condenses, it releases all that energy. This process is thousands of times more efficient at moving heat than conduction alone.
As a result, a typical copper heat pipe can have an effective thermal conductivity of 10,000 to 100,000 W/m·K. For comparison, solid copper is only around 400 W/m·K. It moves heat faster, and with a much smaller temperature difference from end to end, than a solid bar of metal ever could.
Key Performance Metrics: Thermal Resistance & Heat Transport Capacity (Qmax)
When evaluating a heat pipe, engineers look at two primary metrics. Understanding these is key to selecting the right one for your application:
- Thermal Resistance (°C/W): This measures the temperature difference between the evaporator and condenser for every watt of heat moved. Just like in other components, a lower thermal resistance is better.
- Heat Transport Capacity (Qmax): This is the maximum power (in watts) the heat pipe can move before its wick “dries out.” If the heat load exceeds Qmax, the capillary action can’t return liquid fast enough, the evaporator dries out, and the thermal transfer process fails. A higher Qmax is better.
What Are the Different Types of Heat Pipe Wicks?

The wick is the most critical component determining a heat pipe’s performance. The main types are sintered powder metal, grooved wicks, and screen mesh. A sintered wick offers the highest power and best performance against gravity. Grooved wicks are cost-effective but highly gravity-sensitive. Screen mesh provides a good balance. The choice of wick dictates the heat pipe’s maximum power (Qmax), orientation capabilities, and cost.
Sintered Powder Metal Wicks: The High-Performance All-Rounder
This is the most advanced and widely used wick structure for high-performance electronics. It is created by fusing tiny metal spheres (usually copper) together at high temperatures, forming a solid but highly porous structure that lines the inside of the heat pipe.
- How it Works: The spaces between the fused particles create extremely small, interconnected pores. These tiny pores generate a very powerful capillary action (pumping pressure).
- Performance: Because its pumping power is so strong, a sintered wick can effectively move liquid against gravity. This makes it the number one choice for applications where orientation is variable, like a laptop, or in a tower server where the heat pipe must work vertically. It can also handle very high heat fluxes (concentrated heat) at the evaporator without drying out.
Its only trade-off is slightly lower permeability (the liquid flows with more resistance), but its high capillary pressure almost always makes it the superior choice for demanding, compact applications.
Grooved Wicks: Simple, Cost-Effective, but Gravity-Sensitive
A grooved wick isn’t a separate material at all. Instead, it consists of a series of very thin axial grooves (like tiny parallel channels) that are cut or extruded directly into the inner wall of the copper tube itself.
- How it Works: These open channels act as a simple path for the liquid to flow back to the evaporator.
- Performance: Grooved wicks have excellent permeability (liquid flows easily with little resistance), so they can move a high volume of fluid. However, the large, open grooves have very weak capillary action. This makes them extremely sensitive to gravity. They work exceptionally well in a horizontal position or when gravity is helping (condenser above evaporator), but their performance drops dramatically when working even slightly against gravity.
This makes them a great, cost-effective choice for high-volume applications where the orientation is fixed and known to be favorable.
Screen Mesh Wicks: Flexible and Good Performance
This “classic” wick type is made from one or more layers of fine woven wire mesh (like a tiny, precise metal screen) that are rolled and inserted into the heat pipe, pressing snugly against the inner wall.
- How it Works: The small openings in the mesh weave create the capillary action needed to pump the liquid.
- Performance: Screen mesh wicks are a great all-around performer, offering a good balance between capillary pressure and permeability. Their pumping power is stronger than grooved wicks (so they can handle some anti-gravity operation) but weaker than sintered wicks. They are a versatile and reliable choice for many general-purpose applications.
Composite Wicks (e.g., Grooved + Mesh)
A composite wick is a hybrid design that tries to achieve the best of both worlds. A common example is a grooved tube that also has a screen mesh wick inserted. The idea is that the grooves provide a high-speed, low-resistance “artery” for the liquid to flow (high permeability), while the fine mesh provides the high pumping power (high capillary pressure) to lift the fluid and distribute it over the evaporator surface. These are typically found in specialized, custom-engineered thermal solutions.
The choice of wick is an engineering trade-off. Capillary Pressure determines its power against gravity, while Permeability determines the maximum volume of fluid it can move. A good wick optimizes the balance between these two factors for the specific application.
| Wick Type | Capillary Pressure (vs. Gravity) | Permeability (Max Heat Transport) | Heat Flux Limit | Relative Cost |
|---|---|---|---|---|
| Sintered Powder | Very High | Low-Medium | Very High | $$$$ |
| Grooved | Very Low | Very High | Low-Medium | $ |
| Screen Mesh | Medium | Medium | Medium | $$ |
| Composite | High | High | High | $$$ |
Which Working Fluid Should Be Used?
The choice of working fluid is dictated almost entirely by the application’s operating temperature range. For a heat pipe to function, the fluid must be in its liquid/vapor saturation state. Deionized water is the most common and effective fluid for electronics cooling (approx. 30°C to 150°C). Other fluids like acetone or methanol are used for lower temperatures or cryogenic applications.
The Importance of Operating Temperature Range
A heat pipe only works when its working fluid can both evaporate and condense. This means the application’s operating temperature must fall within the fluid’s “sweet spot” (its saturation range).
- If the temperature is too cold, the fluid won’t evaporate effectively, and the heat pipe won’t “turn on” or start up.
- If the temperature is too hot, the internal vapor pressure can become excessive, or the fluid’s properties may break down.
For this reason, the fluid selection is the first step. For a CPU that idles at 30°C and runs at 90°C, water is the perfect choice. For cryogenic equipment operating at -50°C, acetone would be required.
Common Working Fluids: Water, Acetone, Ammonia, Methanol
While many fluids can be used, a few dominate the industry for their excellent thermodynamic properties. The most important property is a high latent heat of vaporization, meaning it can absorb a large amount of energy when it evaporates.
The “Merit Number” in the table below is a figure of merit that combines key fluid properties to indicate its overall effectiveness for heat pipe operation. A higher number is better.
Water is the clear winner for electronics. Its latent heat is exceptionally high, and its working range perfectly matches most commercial and industrial applications. Its only drawback is that it freezes at 0°C, which must be considered in outdoor or unconditioned environments.
Fluid Compatibility with Container and Wick Material
The working fluid must be chemically compatible with its container and wick. Any long-term corrosion or reaction can generate non-condensable gas (NCG), such as hydrogen. This gas is a silent killer for heat pipes. It gets swept to the condenser end and gets trapped, forming a “blockage” that prevents vapor from condensing, permanently reducing the heat pipe’s effectiveness. This is why copper and water are such a popular and reliable pairing, as they are highly compatible.
| Working Fluid | Typical Operating Temp Range (°C) | Latent Heat (kJ/kg) | Merit Number (Performance Indicator) |
|---|---|---|---|
| Water | 30°C to 150°C | ~2260 | High |
| Acetone | -20°C to 120°C | ~523 | Low-Medium |
| Ammonia | -60°C to 100°C | ~1371 | High |
| Methanol | 10°C to 130°C | ~1101 | Medium |
What Are the Key Advantages and Limitations of Heat Pipes?
Heat pipes offer incredible advantages, including passive operation (no power, no noise), extremely high thermal efficiency, and flexible, lightweight designs. However, they are not magic. They also have critical limitations. Their performance is capped by physical limits (like the capillary limit), they are sensitive to gravity, and physical modifications like bending or flattening will reduce their effectiveness. Engineers must understand these trade-offs.
Overwhelming Advantages: High Efficiency, Passive, Flexible Design
The benefits of using heat pipes are profound, which is why they are so common in high-performance electronics. The main advantages include:
- Passive and Reliable: A heat pipe has zero moving parts. It requires no power, generates no noise, and has no components to wear out. This gives it an extremely high Mean Time Between Failures (MTBF), making it a “set it and forget it” solution.
- High Effective Thermal Conductivity: As mentioned, their “superconductor” nature means they can move large amounts of heat over a distance with a very small temperature drop. A solid copper bar would need to be much hotter on one end to transfer the same amount of heat.
- Design Flexibility: Heat pipes are lightweight and can be bent and flattened to fit into complex and tight spaces (within limits). This allows engineers to move heat from a cramped, hot component to a remote heat sink located in a cooler area with better airflow.
- Cost-Effective Performance: For the level of thermal performance they provide, heat pipes are an extremely cost-effective solution compared to more complex active cooling systems.
Critical Limitations Engineers Must Understand
A heat pipe is a precisely engineered device that operates on a delicate balance of physics. If it is pushed beyond its intended limits, its performance will drop dramatically. Understanding these limits is the key to a successful design.
- Operating Limits (Qmax): A heat pipe cannot move an infinite amount of heat. Its maximum heat transport capacity (Qmax) is determined by several factors, the most common being the Capillary Limit. This limit is reached when the heat at the evaporator boils off liquid faster than the wick can return it. The wick “dries out,” the two-phase cycle breaks, and the heat pipe stops working effectively.
- Gravity Sensitivity (Orientation Dependence): The wick’s ability to pump liquid is finite. If the heat pipe is oriented against gravity (evaporator above the condenser), the capillary action must fight gravity to return the fluid. This significantly reduces its Qmax. Conversely, operating with gravity assist (evaporator below the condenser) can boost its performance.
- Non-Operational Conditions (Start-up & Freezing): Heat pipes using water can freeze at 0°C. When frozen, the fluid cannot circulate, and the heat pipe will not function until the heat source thaws it. Repeated freezing cycles can also potentially damage the wick structure.
- Manufacturing Constraints: While flexible, heat pipes cannot be modified without consequences. Bending a pipe too sharply can kink or pinch the internal wick, blocking fluid flow. Flattening a round heat pipe reduces the internal area available for vapor to travel, which increases resistance and lowers its Qmax.
Always remember: A heat pipe’s performance is not a single number. It is a dynamic value that depends on its orientation, operating temperature, and any physical modifications. This is why expert design and simulation are crucial.
How Do You Design With and Integrate Heat Pipes?
Designing with heat pipes goes far beyond simply choosing a part number. A successful thermal solution requires a systematic approach, starting with defining your core requirements and carefully considering how the heat pipe will interact with your heat source, your heat sink, and the operating environment. This 5-step process covers the critical engineering decisions you need to make to ensure your heat pipe assembly performs reliably and effectively.
Step 1: Defining Thermal Requirements (Heat Load, Temp Limits, Distance)
The foundation of any thermal design is a clear understanding of the problem you need to solve. Before selecting a heat pipe, you must quantify:
- Heat Load (Q): How many watts does the component generate that needs to be moved? This determines the minimum Qmax requirement for your heat pipe.
- Temperature Limits: What is the maximum allowable temperature for your component (Tmax)? What is the expected ambient temperature (Tambient)? The difference defines your total available temperature budget.
- Transport Distance: How far does the heat need to travel from the evaporator (heat source) to the condenser (heat sink)? Longer distances generally require larger diameter heat pipes.
- Geometric Constraints: What is the available physical space for the heat pipe and the heat sink? Are there any obstacles the pipe needs to bend around?
Step 2: Selecting the Right Heat Pipe (Diameter, Wick, Fluid) based on Qmax and Orientation
Once you know your requirements, you can start selecting the appropriate heat pipe. Key considerations include:
- Diameter: Larger diameters generally have higher Qmax capabilities. Select a diameter whose rated Qmax (adjusted for orientation) exceeds your required heat load (Q) with a safety margin (e.g., 20-30%).
- Wick Structure: This is driven by orientation. If the heat pipe must work against gravity, a sintered wick is almost always required. For horizontal or gravity-assisted orientations, a simpler grooved or mesh wick might be sufficient and more cost-effective.
- Working Fluid: This is determined by the operating temperature range. For most electronics (30°C to 150°C), water is the best choice.
Manufacturers provide charts showing a heat pipe’s Qmax as a function of temperature and orientation (tilt angle). Always consult these charts, ensuring you select a pipe that can handle your heat load under the worst-case orientation it might encounter.
Step 3: Critical Interface Design – Evaporator and Condenser Mounting
A heat pipe’s incredible efficiency can be completely undermined by poor thermal interfaces at its ends. Maximizing heat transfer *into* the evaporator and *out of* the condenser is paramount.
- Evaporator Interface: The heat pipe must make excellent physical contact with the heat source. This requires:
- Surface Flatness: Both the component and the mounting block holding the heat pipe must be extremely flat.
- Thermal Interface Material (TIM): A high-quality TIM (thermal grease, pad, or phase change material) must be used to fill microscopic air gaps.
- Clamping Pressure: Sufficient, uniform pressure must be applied to minimize the TIM bond line thickness and ensure good contact.
- Condenser Interface: Similar principles apply where the heat pipe meets the heat sink fins. Often, heat pipes are soldered or epoxied directly to the fins or base of the heat sink to ensure the lowest possible thermal resistance.
The thermal resistance of the interfaces at the evaporator and condenser can easily be higher than the resistance of the heat pipe itself! Careful mechanical design and assembly are just as important as selecting the right heat pipe.
Step 4: Bending and Flattening Heat Pipes – Performance Trade-offs
One of the great advantages of heat pipes is their ability to be formed into custom shapes. However, these modifications come with performance penalties that must be factored into your design:
- Bending: Heat pipes can be bent to navigate around obstacles. However, the bend radius must be controlled. Bending too sharply (typically less than 3x the pipe diameter) can kink the tube or pinch the wick, restricting fluid flow and reducing Qmax. Each 90-degree bend can reduce Qmax by roughly 2-5%.
- Flattening: Round heat pipes are often flattened (pressed into an oval shape) to fit into very thin spaces, like laptops. Flattening reduces the cross-sectional area available for vapor flow, which increases resistance and significantly reduces Qmax. Flattening a pipe by 50% (e.g., an 8mm round pipe flattened to 4mm thick) can reduce its Qmax by 40-60% or more.
Always consult manufacturer guidelines or perform simulations to understand the impact of bending and flattening on your chosen heat pipe’s performance.
Step 5: The Power of Thermal Simulation for Heat Pipe Assemblies
Designing a complete thermal module involving heat pipes, mounting blocks, heat sinks, and airflow is a complex multiphysics problem. Simple calculations are often insufficient, especially when dealing with bends, flattening, multiple heat pipes, or complex airflow patterns.
This is where Computational Fluid Dynamics (CFD) simulation becomes an invaluable tool. CFD allows engineers to build a virtual prototype of the entire assembly and accurately predict its thermal performance under various operating conditions. It can identify potential issues like wick dry-out, excessive interface resistance, or poor airflow distribution *before* any physical hardware is built.
At Walmate Thermal, we leverage advanced CFD simulation as a core part of our custom heat pipe assembly design process. This allows us to optimize the number, size, and placement of heat pipes, design efficient heat sinks, and guarantee that the final solution will meet your thermal requirements with confidence.
| Design Factor | Key Consideration | Rule of Thumb / Best Practice |
|---|---|---|
| Orientation | How will the heat pipe be oriented relative to gravity? | Use sintered wick for anti-gravity. Check Qmax chart for specific angle. Aim for horizontal or gravity assist if possible. |
| Bending Radius | How sharply does the pipe need to bend? | Minimum bend radius > 3x pipe diameter. Account for ~2-5% Qmax reduction per 90° bend. |
| Flattening Percentage | How much does the pipe need to be flattened? | Minimize flattening. Expect significant Qmax reduction (e.g., 50% flat ≈ 50% Qmax loss). Verify with vendor or simulation. |
| Evaporator Contact Area | How well does the heat source contact the heat pipe(s)? | Ensure flatness < 0.05mm. Use high-quality TIM. Apply sufficient, uniform clamping pressure. |
| Condenser Airflow/Contact | How effectively is heat removed from the condenser end? | Ensure good airflow over fins. Solder/epoxy pipes to heat sink base/fins for lowest resistance. |
Where Are Heat Pipes Used? Key Applications
Heat pipes are the unsung heroes inside many of the devices we rely on daily. Their incredible ability to move heat efficiently in tight spaces makes them indispensable across a vast range of industries. From keeping your ultra-thin laptop cool to managing the thermal load of critical server infrastructure and even ensuring the reliability of satellites in space, heat pipes are a cornerstone of modern thermal management.
Consumer Electronics: Laptops, High-End Desktops, Gaming Consoles
This is arguably the most visible application of heat pipe technology. The demand for thinner, lighter, yet more powerful laptops has made heat pipes essential.
- Laptops: Flattened copper heat pipes snake through the cramped chassis, picking up heat directly from the CPU and GPU. They transport this heat to small, high-fin-density heat sinks located near exhaust vents, where tiny fans provide active cooling. Without heat pipes, the powerful processors in today’s ultra-portable notebooks would instantly overheat.
- High-End Desktops & Gaming PCs: Large tower coolers for enthusiast CPUs often incorporate multiple 6mm or 8mm diameter heat pipes. These pipes lift the heat from the CPU base up into a large array of aluminum fins, dramatically increasing the cooler’s effectiveness compared to a solid metal base alone.
- Gaming Consoles: Like laptops, consoles pack immense processing power into compact enclosures. Heat pipes are crucial for moving heat from the main processors to the system’s cooling fans and heat sinks.
Enterprise & Data Centers: Server CPUs, Network Switches
Reliability and density are paramount in the enterprise world. Heat pipes play a vital role in cooling densely packed server blades and network equipment.
In 1U or 2U servers, space is extremely limited. Custom heat pipe assemblies are often designed to pull heat from multiple CPUs and transfer it to a bank of fins positioned directly in the path of high-speed server fans. This allows for maximum processing power within the tight constraints of the server rack. Similarly, high-power network switches rely on heat pipes to cool critical ASICs and processors, ensuring uptime and network performance.
Industrial & Power Electronics: IGBT Cooling, Enclosure Cooling
Industrial environments often involve high power loads and challenging operating conditions. Heat pipes offer a robust, passive solution.
- Power Electronics: Components like IGBTs in Variable Frequency Drives (VFDs) or power inverters generate significant heat. Heat pipes embedded in large heat sinks help dissipate this heat effectively, ensuring the reliability of critical industrial machinery.
- Sealed Enclosures: In factories or outdoor telecom cabinets, electronics often need to be sealed against dust and moisture. Heat pipes can be used to transfer heat from inside the sealed box to an external heat sink, cooling the internal components without compromising the enclosure’s integrity.
Aerospace & Defense: Avionics, Satellite Thermal Control
In aerospace and defense, reliability is non-negotiable, and components often operate in extreme environments with no possibility for maintenance. Heat pipes provide a proven, passive thermal management solution.
From cooling avionics modules in fighter jets to managing the temperature fluctuations experienced by satellites orbiting the Earth, heat pipes offer a lightweight, highly reliable way to move heat without requiring power or introducing potential points of failure like fans or pumps. Specialized designs using materials like ammonia are used for the wide temperature ranges encountered in space.
Heat Pipe Manufacturing and Customization
Understanding how heat pipes are made illuminates why quality control and customization are so critical. While the concept is elegant, manufacturing a reliable heat pipe involves precise steps to ensure it functions perfectly over its lifespan. For many demanding applications, a standard, off-the-shelf heat pipe isn’t enough. Partnering with a manufacturer capable of producing custom heat pipes and integrated thermal assemblies is often the key to unlocking optimal performance.
Standard vs. Custom Heat Pipes: When is Custom Necessary?
Standard heat pipes come in common diameters (e.g., 6mm, 8mm) and lengths, usually with sintered or grooved wicks and water as the working fluid. They are excellent for many applications. However, a custom heat pipe becomes necessary when:
- Your product has unique geometric constraints requiring specific bends, flattening, or non-standard lengths.
- You need to maximize performance within a very tight space, demanding optimized wick structures or diameters.
- Your application involves unusual operating temperatures requiring alternative working fluids.
- You need the heat pipe integrated directly into a complex heat sink or cold plate assembly.
A custom solution ensures the heat pipe is perfectly tailored to your application’s exact thermal and mechanical needs.
The Manufacturing Process: From Tube to Sealed Device
Creating a heat pipe involves several meticulous steps:
- Tube Preparation: A high-purity copper tube is cut to length and thoroughly cleaned.
- Wick Installation: The chosen wick structure (sintered powder, mesh, or grooves) is inserted or formed inside the tube. Sintering involves filling the tube with powder and heating it in a furnace.
- End Capping & Filling Tube Attachment: One end of the tube is sealed shut, often by pinching and welding. A small fill tube is typically attached to the other end.
- Vacuum Evacuation: The tube is connected to a high-vacuum pump via the fill tube. Air and any contaminants are pumped out, creating a near-perfect vacuum inside. This is critical for the two-phase process to work.
- Fluid Charging: A precisely measured amount of the working fluid is injected into the vacuum through the fill tube.
- Sealing: The fill tube is pinched off and hermetically sealed, trapping the working fluid and vacuum inside.
Each step requires careful control to ensure the purity of the materials, the integrity of the seals, and the correct amount of working fluid.
Quality Control: Leak Testing and Thermal Performance Validation
Because a heat pipe relies on a perfect vacuum seal, quality control is paramount. Even a microscopic leak can allow air (Non-Condensable Gas) to enter over time, ruining performance.
Reputable manufacturers like Walmate Thermal perform 100% leak testing on every heat pipe using sensitive equipment like helium mass spectrometers. Additionally, samples from each batch undergo thermal performance testing to verify they meet the specified Qmax and thermal resistance values. This ensures every heat pipe shipped meets the highest standards of reliability.
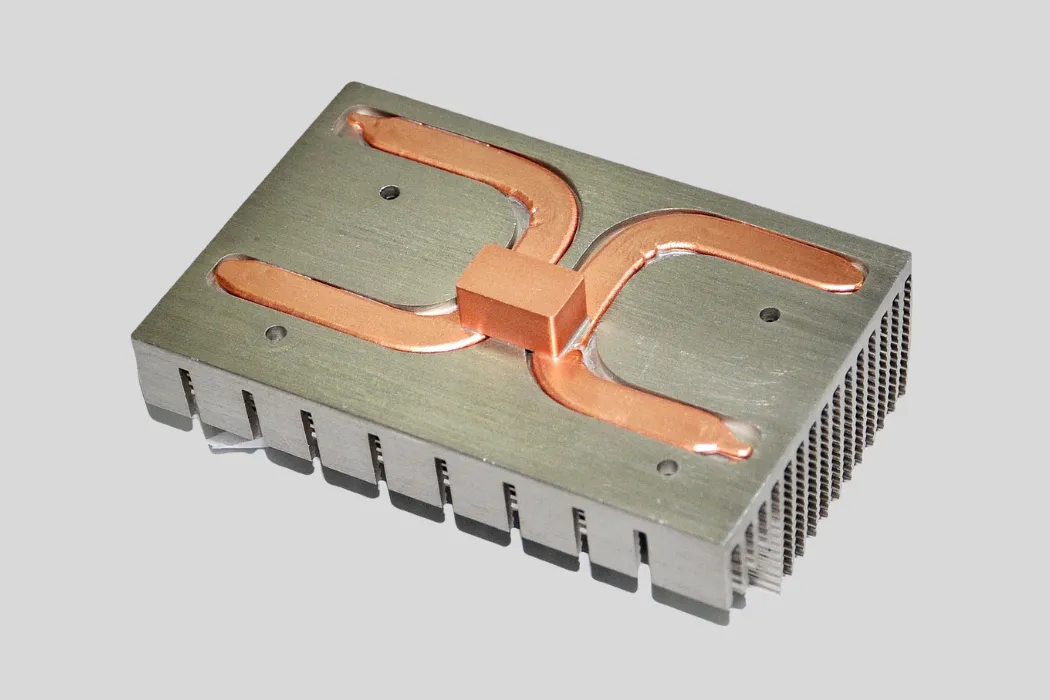
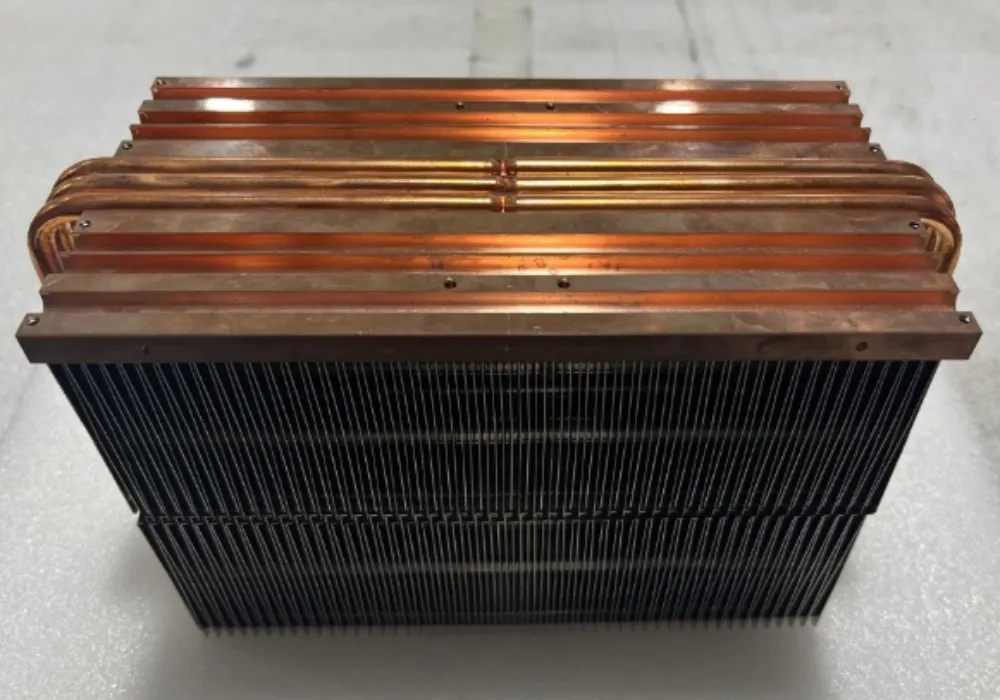
Building Custom Heat Pipe Assemblies (Integrated with Heat Sinks/Cold Plates)
Often, the greatest value comes not just from the heat pipe itself, but from its seamless integration into a complete thermal module. This involves expertly joining the heat pipes to a mounting block (evaporator interface) and a heat sink or cold plate (condenser interface).
At Walmate Thermal, we specialize in designing and manufacturing these custom heat pipe assemblies. We leverage our expertise in both heat pipe technology and heat sink/cold plate manufacturing (including extrusion, skiving, CNC machining, and FSW) to create optimized, fully validated thermal solutions. This one-stop capability ensures perfect component matching, simplifies your supply chain, and delivers a thermal module guaranteed to perform.
Frequently Asked Questions (FAQs)
1. Are heat pipes better than solid copper for cooling?
In terms of effective thermal conductivity over a distance, yes, significantly better (often 10-100x). A heat pipe can move heat much further with a smaller temperature drop. However, solid copper is still essential for the initial heat absorption at the source (like the base of a cooler).
2. Do heat pipes wear out or require maintenance?
Properly manufactured heat pipes are hermetically sealed and contain no moving parts. They should theoretically last indefinitely and require no maintenance. Poor manufacturing (leading to leaks or NCG) is the primary cause of failure.
3. Can heat pipes work against gravity?
Yes, but their performance (Qmax) is reduced. Sintered wicks are specifically designed for anti-gravity operation due to their high capillary pressure. Grooved wicks perform very poorly against gravity.
4. What happens if you bend a heat pipe too much?
Bending too sharply (less than 3x diameter radius) can kink the tube or pinch the wick. This restricts both vapor flow and liquid return, significantly reducing the heat pipe’s Qmax and potentially causing it to fail under load.
5. What is a “flat heat pipe” or “vapor chamber”?
A flat heat pipe is simply a round heat pipe that has been pressed into an oval shape. A vapor chamber is a different technology – essentially a large, flat, planar heat pipe. Vapor chambers excel at spreading heat uniformly over a large area, making them ideal for cooling multiple or large heat sources.
6. Can heat pipes freeze? Does it damage them?
Yes, heat pipes using water will freeze at 0°C. When frozen, they temporarily stop functioning. While repeated freezing/thawing cycles *can* potentially degrade the wick over a very long time, high-quality heat pipes are generally designed to withstand this without damage.
7. How do you attach a heat pipe to a heat sink?
Common methods include soldering, using thermal epoxy, or mechanically press-fitting into grooves in the heat sink base. Soldering generally provides the lowest thermal resistance but is more complex. Epoxy offers a good balance. Press-fitting is simplest but has the highest interface resistance.
8. Why use a heat pipe instead of just a bigger heat sink?
Heat pipes allow you to overcome the limitations of conduction in the heat sink base. They can move heat much more quickly and efficiently from the heat source to the fins, allowing a smaller, lighter, or more effectively designed heat sink to perform much better than a simple block of metal of the same size.
9. Can Walmate help me simulate a heat pipe assembly before I order?
Yes, absolutely. CFD thermal simulation is a core part of our custom design service. We can model your entire system, including heat pipes, heat sinks, and airflow, to validate the design and ensure it meets your performance targets before you commit to tooling or prototypes.
Conclusion: Leveraging the Power of Two-Phase Cooling
Heat pipes truly represent an elegant feat of engineering. These remarkable passive devices offer exceptional heat transfer capabilities, acting as thermal superconductors to move heat efficiently and silently. However, as we’ve explored, harnessing their full potential requires more than just understanding the basic principle. Careful consideration of wick structures, working fluids, operating limits, and integration methods is crucial for a successful and reliable thermal solution.
While standard heat pipes can solve many thermal challenges, maximizing performance—especially within the tight constraints of modern electronics or in demanding industrial applications—often necessitates a custom approach. The optimal solution frequently lies in a custom-designed heat pipe assembly, where the heat pipes, evaporator interface, and condenser heat sink are engineered as a single, cohesive unit, validated by simulation and built with precision manufacturing.
Unlock the full potential of heat pipe technology for your product.
Walmate Thermal specializes in the design, simulation, and manufacturing of custom heat pipe assemblies integrated with high-performance heat sinks and cold plates. Our end-to-end process ensures you get a thermal solution that is not just powerful, but perfectly tailored to your needs.Contact our thermal engineering experts today for a consultation and quote. Let’s move your heat, intelligently.